One of the earliest games I played on a personal computer was Jupiter lander on the VIC 20. Back then the Lunar Lander genre stood up there besides Space Invaders & Break-out. While games have come a long way since then, reconstructing one of these simpler games can still be an interesting exercise. It allows our going through all the steps of creating a game but on a manageable scale. So for sentimental reasons, this post will detail making such a Moon Lander Game in JavaScript.
The Scope
However, I will only be making a small limited version of the Moon Lander style game in which the player must safely bring the lander to the pad. It will provide a single run of the game, and then inform the player of their success. There will be no menus nor score-keeping such as would be needed in a complete game. For drawing, HTML5 Canvas will be used with all objects constructed from basic geometry rather than sprites.
Given its arcade nature there will be no super accurate modelling of the lander’s physics. Only basic maths will be required. Nor I am not trying to fully replicate the games that have gone before. This is only a small learning exercise. For those interested, a more faithful recreation would be part of the Lunar Trails Art Project.
Project Design
In approaching this project, the two most important considerations were the maths I would use for the simulation and then graphic components that would be used. Following this was how the code itself would be structured. Let’s consider these in further detail.
Simulation
As mentioned, I keep the maths very simple here to respect the arcade nature of the genre. So I can get by with Newton’s Second Law of motion:
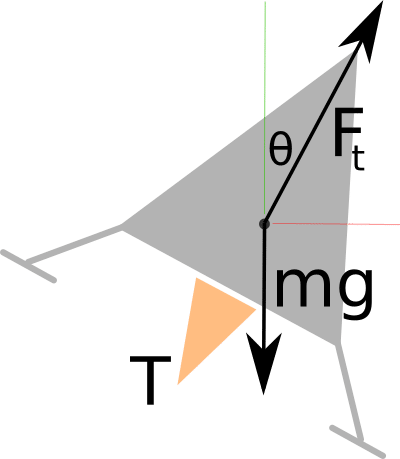
In this case, it is the acceleration that I need to determine each time the simulation is updated. The dynamics of the lander can be described in the image below when tilted by an angle θ and firing the engine with thrust T.

I assume the lander has mass m and is subject to a gravitational acceleration of g. If I separate out the overall acceleration into the x & y components:
These are the equations required to determine the acceleration. From this, we can keep track of the lander’s velocity & position for each update based on the since the previous one. Furthermore, the mass of the fuel will be reduced each time the engine is fired to ‘simulate’ the changing weight of the lander. Overall while not being particularly accurate this will suffice for the project.
Graphics
The Canvas API provides the graphics for this Moon Lander Game. I will only be using some of the more basic drawing commands without the need for sprites. There are just two main things to be aware of: setting the API up and then the game loop for updates. A detailed guide of Canvas can be found in the MDN Canvas API documents.
Canvas SetUp
To use Canvas one must provide a canvas element within the HTML page.
<canvas id="Main" width="640" height="480"></canvas>The Canvas then needs to be prepared in the JavaScript before it can be used.
# Prepare the canvas
var canvas = document.getElementById('Main');
var context = canvas.getContext('2d');
                :
# Draw a black square
context.fillStyle = "black";
context.fillRect(0, 0, 100, 100);
Only the most basic commands are used within the Moon Lander Game. For example, the ground is made from connected lines, as is the lander. The flame uses a filled half-circle and the warning lights are made from rectangles.
Game Loop
The core of any game will be its game loop and it is no different here. Traditionally Canvas games used the setInterval() command to run the game loop with an interval of milliseconds. Unfortunately, this approach will not result in a perfect frame rate and there is no synchronisation with the display refresh. Also, the game will still update even when the game is not in focus.
A better approach available to modern browsers is to use requestAnimationFrame(). This resolves the issues with the previous method. An in-depth discussion can be found in this tutorial post about creating a proper game loop. If older browser support is required then there are shims available to provide the missing functionality.
In the main loop of the game, the simulation is updated and the scene is drawn out as can be seen below.
(function gameLoop() {
    update();
    draw();
    window.requestAnimationFrame(gameLoop);
})();
Structure
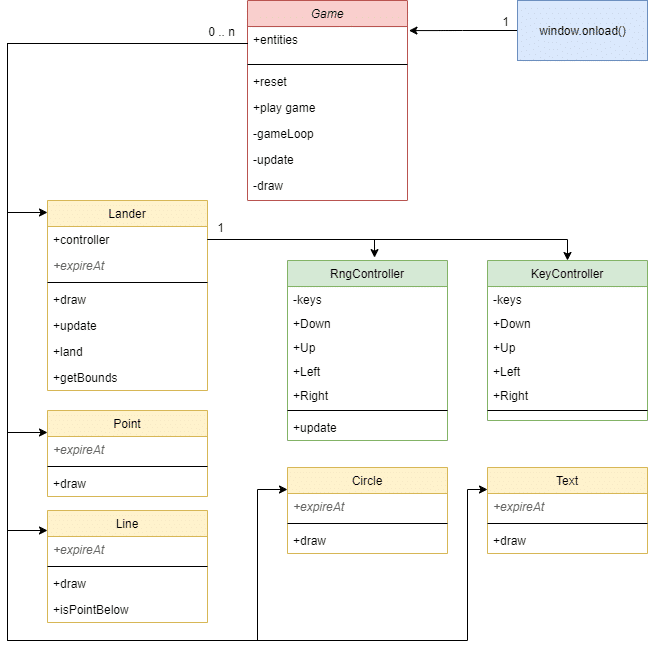
When designing this game I considered that it would be based around three main classes:
- Game class – this is the centre of the game including the game loop discussed above and the the GUI interface. It is also be responsible for populating the game world.
- Entity classes – these are the actual objects of the game world and provide varying degrees of complexity, but are responsible for the drawing and control of individual objects. The most notable such class is the lander class for the moon lander itself.
- Controller classes – these provided the control of the lander class. Currently, there are two of these: one for player control and one to provide random motion.

Note: All the entity classes may contain a property expireAt which if present will result in the object expiring at that timestamp.
Flow of Control
Upon opening, the window.onload() is used to instantiate the main game class and the user interface. As part of its construction, a new ground layer is made out of Lines and the game then waits for the player to start a new game. Once it is started a Lander is then added to the game with a single a KeyController attached. The player can then attempt to bring the lander onto the pad. The game loop is running the entire time to update and draw objects with each screen refresh. Finally, upon completion, the Lander is removed from the screen. Alternatively, a swarm of Landers under random control is released and run until crashing (or very rarely managing to land).
Implementation
The game’s implementation followed the design very closely. The final result can be seen below.

Several interesting details are worth mentioning. In particular, the implementation of the entity list and the mechanism used for collision detection.
Entity list
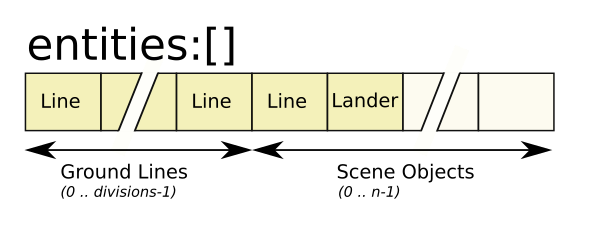
The entity list is used to hold all visible elements and for updating their physics and display. It is a JavaScript array held within the Game class. New items pushed onto the end. The draw and update passes can then be performed by iterating through the list, calling the appropriate draw or update functions. Finally, there are functions to provide basic maintenance for such tasks as deletion and the expiry of finished items.

When first constructing a scene, the list is populated with the lines from the ground which will then remain in place until the game is reset. Because the ground is composed of line segments that have the same horizontal width, it is easy to find the ground index of a given x position.
Collision detection
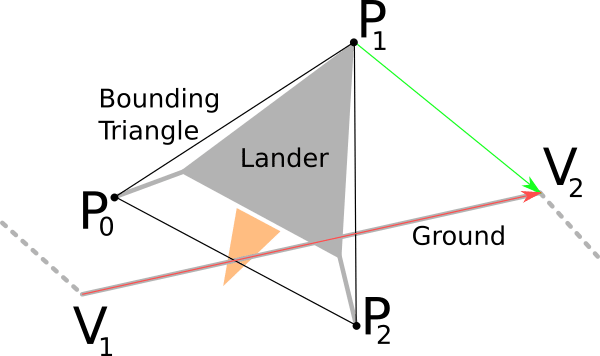
The collision detection only needs to occur between the ground and a lander. This limitation allows for a relatively simple collision test to be utilised. The lander is enclosed with a bounding triangle as shown below.

Each update, the three points are checked to see if they lie below their corresponding ground line. This is done by comparing the 2D Cross Product between a vector along the ground line (red line ) and each of the bounding points (green line
) one at a time. The function below performs this test.
this.pointBelow = function(x, y) {
    return ((x2 - x1) * (y - y1) - (y2 - y1) * (x - x1)) >= 0;
};
The following Stack Exchange discussion was the inspiration for this approach.
Overall this mechanism is limited in what it can do but is relatively quick. It does exactly what is required and no more.
dat.gui
This is almost an aside, but as part of this project I wanted to use dat.gui to see how it worked. For those interested, I would recommend the tutorial. This library provides a quick and dirty GUI for web-based graphics projects and worked as described. I suspect that a web designer may consider it a waste of time and just create their HTML directly. The GUI was created in the onload function, interfacing directly into the main Game class.
window.onload = function() {
    var game = new Game();
    var gui = new dat.GUI();
    gui.add(game, 'message');
    var landerF = gui.addFolder('Lander Physics');
    landerF.add(game, 'gravity', 0, 10);
    landerF.add(game, 'thrust', 0, DEFAULT_THRUST * 2);
    landerF.add(game, 'fuel', 0, DEFAULT_FUEL * 2);
    var terrainF = gui.addFolder('Terrain');
    terrainF.add(game, 'divisions', 5, 20);
    terrainF.add(game, 'groundHeight', 0, 200);
    terrainF.add(game, 'mountainHeight', 0, 200);
    var autoF = gui.addFolder('Auto Landers');
    autoF.add(game, 'landers', 0, 200);
    autoF.add(game, 'display', [ 'full', 'point', 'none' ] );
    gui.add(game, 'play game');
    gui.add(game, 'reset');
};
Constants
Several constants had to be provided for the game. Some could be arbitrarily decided and had no real meaning beyond aesthetics (i.e. the number of divisions of the ground). Others were fundamental to the simulation, such as the mass of the lander. These would have a great impact on the feel of the game. Where possible, I wanted to source these from something real so I used the real Apollo LEM as a source of inspiration for most of the values.
// Default physical constants for the game
var DEFAULT_MASS = 6000;        // Roughly based on LEM
var DEFAULT_FUEL = 8000;        // Fuel on the decent module
var DEFAULT_DELTA_FUEL = 8;     // HACK - fuel used per update
var DEFAULT_GRAVITY = 1.62;     // Acceleration of the moon
var DEFAULT_THRUST = 45000;     // 45000N as per the LEM engine
var DEFAULT_ANGLE_LIMIT = 0.1;  // About 6 degrees
var DEFAULT_SPEED_LIMIT = 2;    // 2 m/s  (~ Apollo 17 landing)
evar DEFAULT_SPEED = 2;          // Game speed - make it faster!
The safe limits are somewhat arbitrary, though I did take the landing speed from an interesting forum discussion on the topic. Also, I hacked the fuel usage as the original LEM engines provided a variable thrust.
One final issue was that I wanted the game to ‘feel’ similar for all players. To this end, I had to ensure that the timing in the game was tracked. Each update includes the timestamp and so in this way it is possible to determine how many milliseconds have elapsed since the last update. This fraction of a second is used in the acceleration and velocity calculation. This ensures a consistent basis for the game when played on different machines.
Extra
I also provided the ability to support non-player controllers to ‘fly’ the lander. Currently there is only a controller that randomly chooses a button to push each update. This can been tested in the ‘auto’ menu item. A future project might include an exploration of automated control systems.
Source Code
The source code for this post can all be found in a GitHub repository, which includes details on how to run the projects. The project uses NodeJS for the back-end, but all that is needed are the HTML & JavaScript files from the public folder. For those just wanting to see the final product, I have included a single file demo:
This demo requires a keyboard and so won’t work from a mobile.
Instructions
Click on ‘new game’ to start. The cursor keys are used to control the lander. The down key is used to release the lander into player control. The GUI to the top right allows some degree of adjustment and the option to deploy multiple ‘auto’ landers. The reset button builds a new scene and applies any option changes that have been made in the menu.
Final Thoughts
With this post, I have taken the reader through how my Moon Lander Game works. I have not shown all the steps required to produce the game. However, I have provided some of the information that might be of use for those interested in such an undertaking. Writing such a small but complete game would be an important first step for any potential indie game developers.
From my own perspective, I also was able to use the project to experiment with the dat.gui GUI and to create a possible framework that I might use to play with automated control in the future.
Links
- PCMag article about the history of Moon Lander Games
- Wikipedia page on the Atari Lunar Lander game
- Lunar Trails Art Project ( The best JavaScript Moon Lander Game IMO)
Updated Nov 2023
Included a header image for the post.
Notice
The header image was originally AI generated by Microsoft Designer, otherwise all photos & diagrams that appear on this post are my own.